Recently I’ve been having a tinker with iOS development, and was especially
interested in doing something to do with camera capture and manipulation.
Unfortunately without signing up for a $99 Apple developer account you can’t
deploy or debug your code on an iPhone device, and the iPhone/iPad simulator
doesn’t emulate anything camera related. Not ideal. However with a little bit of
tinkering, it is possible to enable deployment onto your jailbroken device, as
well as debug to your heart’s content! So, here’s a step by step guide to doing
just that:
NB: I’ve only tested these steps with an iPhone4 on iOS5 and using XCode4.2.
I also don’t take any responsibility for any issues you get following these
steps, nd I should point out that this breaks the terms and agreements both in
XCode and iOS
I should also say I took a lot of this from
alexwhittemore’s awesome blog post.
Hopefully I just made it a little easier and made sure it worked on Lion,
XCode4.2 with iOS5…
Step 1: Jailbreak your iDevice
To be able to get unsigned code onto your device, you’re going to need to
jailbreak your iDevice. It’s relatively simple these days and using redsn0w is
pretty much a one click solution, for more info visit
http://blog.iphone-dev.org/
Step 2: Get Appsync from cydia
Now you’ve jailbroken your iDevice, you need to install a bit of software called
Appysync that bypasses the code signing that Apple does when you try and load an
executable. This is so your can install your own apps without needing a valid
provisioning license from Apple (what you need to pay $99 for).
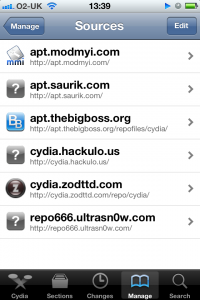
To do this, goto cydia, click manage and add the following depot to your list of
depots:
http://cydia.hackulo.us
Cydia might show a
popup saying that this repository has been marked for illegal activity, which
you can ignore (this is because Appsync allows you to install any unsigned
app, which could be used to install things illegally. It should go without
saying not to do that, this guide is only for running your own code, not someone
else’s illegally!)

Once you have the repository source added, search and install AppSync for iOS5.
Step 3: Patching XCode4.2
Now you’ve setup your iDevice, the next stage is to make it so that you can
disable XCode from trying to sign your app with its provisioning profile. The
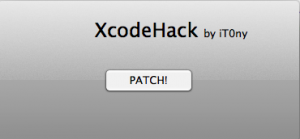
easiest way to do this is to simply run XcodeHack.app, which you can get from
http://xsellize.com/topic/132661-releasexcodehack-v101/
Simply run this exe and click the “PATCH”. Done!

Step 4: Setup a Post-Build fake signing step to your project
The final step is make a few changes to your XCode iOS project in order to stop
XCode from signing your app, and add a post-build step to “fake sign” your app,
using a sign-signing certificate.
Step 4.1: Disable XCode signing
Click On the project (making sure your targetting iOS Device and not a
simulator) and then under “Code Signing” change the Code Signing Identity to
“Don’t Sign Code”

Step 4.2: Create a self-signed certificate
You now need to create your own self-signing certificate to fake sign with. To
do this simply follow
this
guide from Apple. For simplicity’s sake call the certificate iPhone Developer to
make the next few steps easier to follow.
Step 4.3: Download the following script
Next, download
this
little script that will make code signing nice and simple. Put it wherever you
like, I put it in a /Developer/FakeCodeSign folder. Make sure you make it
executable. Or run these commands from Terminal:
mkdir /Deveoper/FakeCodeSign
cd /Developer/FakeCodeSign
curl -O http://www.tomjbward.co.uk/uploads//uploads/posts/jailbroken-ios-development-with-xcode4-2/gen_entitlements.py
chmod 755 gen_entitlements.py
Step 4.4: Add Post-Build step
Finally we need to add a post-build step to run this script before we deploy and
debug. You’ll need to add this to every iOS project you create!
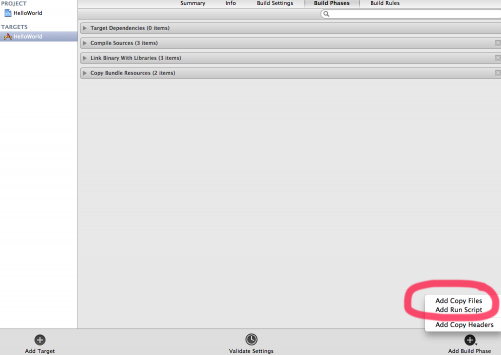
Click on your project, then click your app in the Targets list and goto “Build
Phases”. Next press the “Add Build Phase” in the bottom right-hand corner and
select “Add Run Script”

Now expand the Run Script box and enter the following (replace “iPhone
Developer” with whatever you called your certificate)
export CODESIGN_ALLOCATE=/Developer/Platforms/iPhoneOS.platform/Developer/usr/bin/codesign_allocate
if [ "${PLATFORM_NAME}" == "iphoneos" ]; then
/Developer/iphoneentitlements401/gen_entitlements.py "my.company.${PROJECT_NAME}" "${BUILT_PRODUCTS_DIR}/${WRAPPER_NAME}/${PROJECT_NAME}.xcent";
codesign -f -s "iPhone Developer" --entitlements "${BUILT_PRODUCTS_DIR}/${WRAPPER_NAME}/${PROJECT_NAME}.xcent" "${BUILT_PRODUCTS_DIR}/${WRAPPER_NAME}/"
fi

And that’s it! You should now be able to deploy, run and even debug your project
without having to pay Apple for the priviledge!
UPDATE:
Just tried to profile some code I’d written in instruments, and my iPhone really
didn’t like it, making it crash… If anyone knows a way to get this working
then I’d appreciate knowing how!