It’s been awhile since I’ve done any development on NUKE, so when the other day
I was asked to put together a simple plugin on OSX, I thought it would be a good
time to try and create a simple XCode project to do my development in.
My reasoning for doing this was two fold. Firstly, Nuke’s SDK currently ships
with a simple Makefile that you can use to build all of the example plugins.
However, it uses GCC as the compiler and references the 10.6 SDK (!), both of
which hasn’t shipped with XCode for an age. The second reason is that XCode
nowadays provides lots of really useful features, so while I don’t mind
programming in Terminal and VIM, it’s much more enjoyable to take advantage of
all the modern features available.
For those who don’t want to create it from scratch,
I’ve put the finished XCode project up on github,
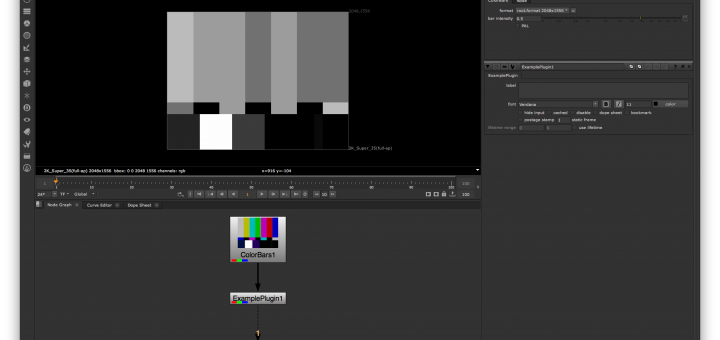
feel free to clone and modify to your hearts content! The “ExamplePlugin” does a
very simple greyscale filter on the RGB channels and maintains the alpha. It’s
not all that efficient, but is a simple plugin.
For those who want to do it from scratch, here’s a list of common gotchas that
you want to watch out for.
Create a “Bundle Project”
When creating the project, make sure you select “Bundle” under “Framework &
Library” rather than something like “Generic C++ Plugin”. This subtly changes
the way your code is linked and, if you don’t do this, Nuke won’t be able to
load your plugin correctly.
Change the Build Settings
There are various build settings you’ll need to change to get it to compile
correctly and then not crash! Here’s the one’s you should change:
- CLANG_CXX_LIBRARY=libstdc++ - By default it’s “libc++”, but as NUKE is
compiled with libstdc++, you’ll need to match this, otherwise you’ll get some
strange compiler errors about std symbols
- VALID_ARCHS=x86_64 - Pretty obvious, NUKE is 64-bit only
- OTHER_LDFLAGS=-lGLEW -lDDImage - You’ll need to link against DDImage and
GLEW to compile your app
- HEADER_SEARCH_PATHS=/Application/Nuke/Nuke.app/Contents/MacOS
- Setup your header search paths to whatever version of Nuke you’re targetting
- LIBRARY_SEARCH_PATHS=/Application/Nuke/Nuke.app/Contents/MacOS
- Again, set the linker path up to find the DDImage libarary
- MACOSX_DEPLOYMENT_TARGET=10.6 - As NUKE still supports 10.6, you should
make sure you build your plugin with 10.6 support. Changing the deployment
target means you can still use whatever SDK you have installed, but that it
doesn’t allow you to use more modern SDK calls, which is useful.
Add a User-defined setting for the Nuke Application folder
This isn’t necessarily required, but it’ll make changing between versions on
NUKE a lot easier. Adding the NUKE_APPLICATION_FOLDER user setting means that in
the previous settings, you can put $NUKE_APPLICATION_FOLDER instead of a
hard-coded path, and then you just need to change one place in order to get it
to compile against a different version! You could even add multiple targets for
different versions, which is cool
Add a Post-Build step
Again this isn’t necessarily needed, but it’ll make developing and testing a LOT
easier. What I did was simply copy the bundle executable XCode creates and
copied it into my “.nuke” folder, which would get picked up by Nuke on startup.
Something like this:
cp $CONFIGURATION_BUILD_DIR/$PRODUCT_NAME.bundle/Contents/MacOS/$PRODUCT_NAME ~/.nuke/$PRODUCT_NAME.dylib
And Finally…
For Nuke 9 and above, by default Nuke starts with breakpad enabled, which is a
mechanism with which to report crashes back to The Foundry (which is really
useful by the way!). In order to allow you to debug your plugin, you need to run
Nuke with the following arguments:
/Applications/Nuke<version>/Nuke<version>.app/Contents/MacOS/Nuke <version>--crashhandling 0
This will disable crash handling and allow you to attach XCode to debug your
plugin.
Good luck!