Recently I’ve been getting my teeth into NoSQL-based map-reduce problems, where
I want to throw a lot of data into a database and then produce some interesting
queries. For this I decided to start playing about with MongoDB, which seems to
be one of the most popular solutions out there. For this, I wanted to get
it running as a system service, in the same way as having Apache and MySQL setup
on my macbook. Here’s what I did to get this setup using launchd and a
_mongodb system user.
Installing MongoDB
This is the easy bit :) You can install through homebrew, but I decided to just
install manually as it’s just as easy. As this might be out of date, I’d
recommend following the instructions
here, but
just incase, here’s how I did it.
First you need to download the latest tar, which at the time of writing is
3.0.2. In Terminal, issue the following command:
curl -O http://downloads.mongodb.org/osx/mongodb-osx-x86_64-3.0.2.tgz
Next you want to extract the files, the simplest way is with the following
command:
tar -zxvf mongodb-osx-x86_64-3.0.2.tgz
With the files extracted, you want to copy them somewhere that’s in your path,
or directly add the mongodb/bin folder. To parody what MySQL and git does, I
decided to copy them into a folder in /usr/local, and then create symlinks
inside /usr/local/bin. This allows it to be available to all
sudo mkdir /usr/local/mongodb
sudo cp -R -n mongodb-osx-x86_64-3.0.2/ /usr/local/mongodb
sudo ln -s /usr/local/mongodb/bin/mongo /usr/local/bin/mongo
sudo ln -s /usr/local/mongodb/bin/mongod /usr/local/bin/mongod
You should now have “mongo” (the client app) and “mongod” (the daemon) in your
path. you can test this by running “which mongo” in Terminal and checking it
returns the newly created “/usr/local/bin/mongo” symlink. If it doesn’t you’ll
want to check your PATH environment var.
With mongo installed, the next task is to setup the data directory. By default,
mongodb using “/data/db” as the folder, but you can put it wherever you want.
I’m kinda ok with it being here, so let’s create this folder so that we can run
the daemon.
We should now have everything setup that we need to run the mongo daemon as the
current user. So in Terminal, type:
If you decided to change the data directory, you’ll need to specify the directoy
when running mongod using the –dbpath option:
mongod --dbpath <data directory>
Setting up a Daemon Account
With MongoDB installed and working, the next task was to setup a new user
account to run the service. The reason for doing this was to better control what
access they have to the system, and to emulate how MySQL is setup on an OSX
machine.
There’s several ways to create a new user on an OSX machine, but the “correct”
way to do this for a non-interactive system account is to use a tool called
“dscl”. Let’s go through the commands you’ll need to do to create the account
correctly:
sudo dscl
cd /Local/Default
This will put us into the correct part of the directory service, ready to create
the new user. First, we need to create a Group to assign the user to. To do
this, we need to find a free GroupID (gid). You can list the current groups with
the following command. For a daemon group, you want to ideally look for an ID
below 500:
On my machine, 300 was available, so let’s go ahead and create a new “mongodb”
group. By convention service groups have an underscore prefix, so I’ll follow
this as well.
create Groups/_mongodb
create Groups/_mongodb PrimaryGroupID 300
Now we should have the group setup, let’s go about creating the User. Again we
want to find a free UserUD (uid), and again for a daemon user, you want to look
for an ID below 500.
Again I found that 300 was available, so let’s go ahead and create a new
“mongodb” user. Again the convention for service users is to have an underscore
prefix. This time, there’s a few more things we want to setup (the shell, for
instance) but it should be all pretty self-explanatory:
create Users/_mongodb UniqueID 300
create Users/_mongodb PrimaryGroupID 300
create Users/_mongodb UserShell /usr/bin/false
create Users/_mongodb NFSHomeDirectory /var/empty
This should setup a new User which doesn’t have a HOME directory and no shell.
Next we need to do is actually tell the Group that it has “_mongodb” as a user:
append Groups/_mongodb GroupMembership _mongodb
You can now exit dscl by calling exit, which will take you back to the prompt.
With the user and group accounts setup, you’ll probably want to prevent the user
from showing up in the login screen. Executing the following will do this for
you:
sudo dscl . delete /Users/_mongodb AuthenticationAuthority
sudo dscl . create /Users/_mongodb Password "*"
Finally we’ll want to change the ownership of the dbpath we setup earlier to be
owned by this user. Doing the following should do this for you:
sudo chown -R _mongodb:_mongodb /data/db
Creating the System Service
With the account and mongodb setup, the next step is to create the System
Service. In Yosemite, the easiest way to do this is to use launchd, Apple’s
built in daemon manager. Because we want to run the service using the newly
created system account, we’ll need to add it as a System daemon rather than a
global/user daemon. To do this, we will first create a new plist file that
defines the arguments and options for the service.
sudo touch /System/Library/LaunchDaemons/org.mongodb.mongod.plist
sudo open -a TextEdit /System/Library/LaunchDaemons/org.mongodb.mongod.plist
This will open the file in TextEdit, though you can use whatever editor you
like. Next, add the following:
<plist version="1.0">
<dict>
<key>GroupName</key>
<string>_mongodb</string>
<key>InitGroups</key>
<true/>
<key>KeepAlive</key>
<false/>
<key>Label</key>
<string>org.mongodb.mongod</string>
<key>ProgramArguments</key>
<array>
<string>/usr/local/bin/mongod</string>
<string>--config</string>
<string>/etc/mongodb.conf</string>
</array>
<key>RunAtLoad</key>
<true/>
<key>UserName</key>
<string>_mongodb</string>
</dict>
</plist>
This will setup a new “ord.mongodb.mongod” service, running as _mongodb, and
using a config file to determine the settings for the instance of mongodb. You
can obviously change whatever you need, but if you followed the previous steps,
this is all you should need.
Creating the MongoDB Configuration File
Finally, we need to create the config file to run the above service. The reason
I’ve done it this way rather than via arguments to the plist is I find it easier
to edit configuration files rather than services, but it’s really up to you.
Here’s the config file for my setup, which I put into “/etc/mongodb.conf”:
storage:
dbPath: "/data/db"
directoryPerDB: true
journal:
enabled: true
systemLog:
destination: file
path: "/data/db/mongodb.log"
logAppend: true
timeStampFormat: iso8601-utc
net:
http:
enabled: true
RESTInterfaceEnabled: true
The first setting is defining the dbpath that we want to use, if we should split
db’s by folder and if we want to enable journalling (we do). Next is setting for
where to output the MongoDB log, which I put in the same base folder as my
dbpath, as I find it convenient. If you want to put it elsewhere, just make sure
_mongodb has the right permissions to write to that folder.
The final setting is a dev specific setting, to enable the HTTP and REST
interfaces built into MongoDB. This isn’t recommended for production servers (is
a massive security risk) but it’s useful for development.
With all that setup, we should now be able to load the new service into launchd
using the following command:
sudo launchctl load /System/Library/LaunchDaemons/org.mongodb.mongod.plist
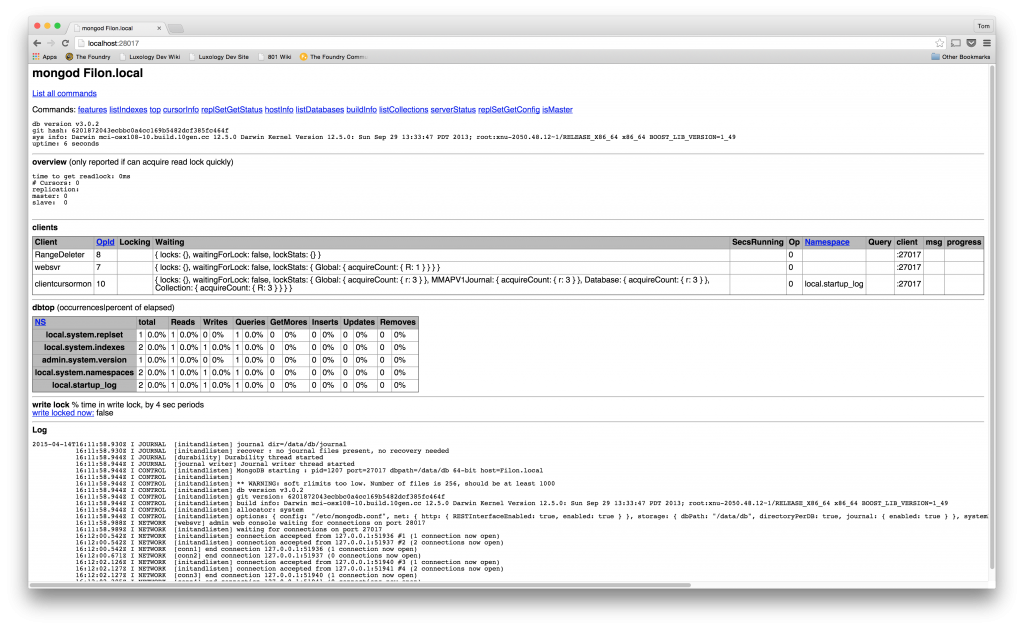
And that’s it! If you now browse to http://localhost:28017/, you should see a
debug page for the local mongoDB!
Launchd Troubleshooting
If you have any issues with adding the launchd service, I found using the
excellent Launch Control application
really awesome. It allows you to simply redirect logs, add/remove settings and
generally debug what the issue could be for the service. I’d highly recommend it
for debugging hard to fathom issues with launchd.